mySoftware [Updates]
newProducts [YOK]

MOX6/MOX8: Cubase and the EDITOR VST
This article will help you get setup to use the MOX6/MOX8 EDITOR VST. This allows you to work with the MOX6/MOX8 via VSTi routing with the DAW environment. VSTi - Virtual Studio Technology Instrument routing is a Steinberg innovation that allows synthesizer engines to be addressed within the Cubase program such that you can RETURN audio from the synth and process it through effect processors also within Cubase. This technology paved the way for so-called “soft synths” and processing within DAW software. VST Effects and VST Instrument routing are a widely accepted protocol for DAWs. Even though the MOX6/MOX8 is a hardware synthesizer and is external to the computer, Yamaha and Steinberg have extended this type of signal routing (via this EDITOR VST) to include devices that are external to the computer. Cubase’s advanced delay compensation and audio routing capabilities help to make this possible.
CHECKLIST: What you will need for this:
MOX6/MOX8 connected to your computer via USB
The Yamaha Steinberg USB Driver for your particular computer’s OS _ (Windows v1.8.3/(Mac v1.8.1)
The MOX6/MOX8 Remote Tools v1.1.3 (or later)
The MOX6/MOX8 Editor Standalone / VST for your particular computer’s OS _ (Windows v1.6.0)/(Mac v1.6.0)
The audio outputs of the MOX6/MOX8 connected to a quality stereo sound system
http://download.yamaha.com
Place the MOX6/MOX8 in a multi-timbral/multi-MIDI channel mode: SONG or PATTERN
For this example we will set the MOX6/MOX8 to dual stereo record:
(This mode allows you to address the external DAW via two discreet stereo feeds - you route signals as you require to accomplish various recording schemes - more on this later).
Press [UTILITY]
Press [F5] USB I/O
Press [SF1] OUT CH (OUTPUT CHANNEL Mode)
Verify that the parameter is set to “4CH”

If not, you will need to change it, press [ENTER] and then reboot the MOX6/MOX8 - for the change to take place.
By making 4 Channels available you will be able to address the DAW on two separate Stereo feed - it is all about flexibility and being able to isolate parts when you want to separate them from the rest.
Important note about the [SF1] OUT CH (OUTPUT CHANNEL): Pressing this button calls up the display which determines whether the maximum number of output channels for USB is 4 channels (2 stereo channels) or 2 channels (1 stereo channel). If transfer of the audio signal between the MOX6/MOX8 and the computer connected to the MOX6/MOX8 is compromised or impossible, set this parameter to “2ch.†This setting reduces the CPU load of the computer, and may resolve the problem. After changing this setting, press the [ENTER] button, then restart the MOX6/MOX8.
_ After changing this setting and pressing the [ENTER] button, make sure to restart the MOX6/MOX8; the instrument will not operate otherwise. Before restarting, make sure to store any important edited data to prevent it from being inadvertently lost.
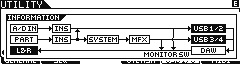
Press [SF6] INFO to view the routing (signal flow) Press [F5] USB I/O
Set MODE = 2StereoRec (Dual Stereo Record Outputs)

Setup in Cubase: Addressing the MOX6/MOX8 via the EDITOR VST
Launch Cubase
Because you have properly installed the REMOTE TOOLS (which includes the EXTENSIONS) Cubase will ask you if you want to use the Yamaha MOX6/MOX8 as your ASIO interface.

Yes, you do!
Open a NEW PROJECT > use the EMPTY template
We will explain how the routing takes place. Later we will show you how to launch using a pre-made Template. For now start with the EMPTY Template.
Create a NEW FOLDER on your computer to house your Project as directed by Cubase - this is where Cubase will keep all the data (images, audio, MIDI, setup, etc)
And again because you have properly installed the REMOTE TOOLS/Extensions, Cubase will automatically setup MIDI, REMOTE, and VST AUDIO SYSTEM settings for you. If not please see the “Cubase: DEVICES Troubleshooting” article.
Go to DEVICES > VST INSTRUMENTS > Click in the first empty item on the instrument rack > EXTERNAL > MOX6/MOX8 VST

You will be asked if you want to create a MIDI Track assigned to this VST device… Create it.
The track’s MIDI OUT will be assigned to the 1-MOX6/MOX8 VST (as opposed to the MOX6/MOX8-1)
The significance of the number “1” out front in the “1-MOX6/MOX8 VST” indicates that you have one MOX keyboard. The Editor VST is able to accommodate all 16 PARTS. You do not ever open a second instance of the “MOX6/MOX8 VST” unless you have second keyboard.
The MIDI CH will be set to 1
Each time you want to play another PART of the MOX6/MOX8 you will need to create another Track and assign it to the 1-MOX6/MOX8 VST. It will be created with the next higher numbered MIDI channel. to create a Track you can right click on the MIDI Track and select ADD TRACK > MIDI or you can go to PROJECT on the Cubase Toolbar, select ADD MIDI TRACK.

The MOX6/MOX8 Editor VST and the tone generator settings
Verify your setting within the Editor VST. If you have setup up before it should just come online. However, for the purposes of this article, we will go through the verification steps - so if you ever need to troubleshoot it you will know how to do so:
On the EDITOR VST:
Go to FILE > SETUP
Verify that the USB Port Details are setup as follows:

Notice that the MOX6/MOX8 communicates on two separate PORTS (Port 1 and Port 4). Port 1 is the normal MIDI OUTmessages of musical note, controller and tempo data. Port 4 is used exclusively for bi-directional communication between the Editor and the MOX6/MOX8 hardware (which is external to the computer).
Tip: You can see in the screen shot above in the AUTO SYNC SETTINGS, I have opted to NOT have the VOICE data restored from the Computer > Synth (PC > MOX6/MOX8). This is a personal choice. The reason I have done this is because anytime the EDITOR is taken OFFLINE and then brought bak ONLINE, this is the data that will be sent from the computer to the MO-X (synchronizing). You do not need to restore the VOICES (that is all USER bank Voices and Drum kits) every time. In fact, it would be the exception, the rare case, when you actually need to restore all of the VOICE data. Setting this to OFF will make synchronization much quicker and more efficient - when you actually do need to restore all VOICE data, you can check that option. I have opted to restore the GLOBAL and the CURRENT settings. This means when I open this Cubase Project the program will ask me if I wish to restore data to the MOX6/MOX8, when I confirm, my Utility mode and MIX settings (CURRENT SONG or PATTERN MIXING) will be restored to my hardware. It simply is not necessary to wait for your VOICES to reload if they are already in place.
Go to FILE > VSTI SETUP
Verify that your USB AUDIO BUS outputs are setup as follows:

You can send data to the MOX6/MOX8 or you can receive data from the MOX6/MOX8. If you have already setup a MIXING setup in your synthesizer you can bring the synthesizer parameters over to Editor VST by requesting a BULK > DATA SYNC via the Editor VST.
The Editor can pull the data over for you. Here’s how:
In the EDITOR, click on BULK on the main menu and select DATA SYNC
Click on RECEIVE

“Receive” is the computer application receiving data from the MOX6/MOX8 hardware.
Click on the options you want to capture. You can capture the CURRENT (the current Mix settings in your MOX6/MOX8) - so recall the SONG in the MOX and then click OK to capture it.
You can additionally capture all the USER bank VOICES, Drum Kits, and even your marked Favorites! This can be very useful in archiving your data on your computer. You can have every VOICE and every possible thing that you could have used in this Project in one nice neat file.
Once the data is captured and you SAVE the PROJECT - every setting is saved.
You are now able to work with Cubase: Record MIDI tracks, create and record Audio tracks, edit the tracks, mix, and go on to complete and even Master your work in a program like WaveLab7.
We should mention that you are now setup to play MIDI data from Cubase > it travels via USB-MIDI to the MOX6/MOX8 hardware which interprets the MIDI messages and generates audio > the audio is routed back to the computer via one of two pair of audio buses USB 1/2 and USB 3/4 > the Editor VST is responsible for returning the audio into Cubase such that it behaves like any internal soft synth. This means the virtual audio is going to found in the VST INSTRUMENT Folder. In this VST INSTRUMENT folder you will see “audio lanes”. It is here that you will see meters for USB 1/2 and USB 3/4.
You need to know how to activate the MOX6/MOX8 VST audio return into Cubase.
Go to DEVICES > VST INSTRUMENTS

On this Instrument Rack you will see several icons - the one to the right of the “e” (edit) is the symbol for OUTPUT “[->“ (an arrow pointing to the right). If you click here you can see each pair of audio RETURNS from the MOX6/MOX8 hardware. This is where you can activate and deactivate the second pair.
This should get you started. There is no one way to proceed.

In the lower left corner of the EDITOR VST panel you will find the QUICK SETUP parameters. If you change this to VST REC, PARTS are routed to the VST INSTRUMENT lane and while you can monitor your sound direct, you can hear the Cubase CLICK by raising the DAW LEVEL on the MO-X front panel.

SUMMARY
The above can be automated by using the NEW PROJECT Templates called “MOX6/MOX8 with VST editor” or “MOX6/MOX8 with VST editor (2Stereo Rec Mode)”. These will setup 16 MIDI Tracks assigned to the MOX6/MOX8 VST and select SONG mode with the VST “QUICK SET” configuration. You may need to make the audio settings: Go to FILE > VSTi SETUP… > Set them to MOX6/MOX8 1, 2, 3 and 4.

In the next article we will deal with the monitoring options available, when to use the different templates and how to get the most out of this powerful hardware/software combination.
Permalink