mySoftware [Updates]
newProducts [YOK]

Part Two: A Getting Started Guide: Motif-Rack XS Editor VST
PART TWO:
A Getting Started Guide:
Motif-Rack XS Editor VST
This article will serve as the second part in a series of articles on getting into the Motif-Rack XS Editor VST...
Please see the first part as this will continue to work with the same Cubase Project demo material provided in that article.
Mixing the art and science
In this part of the tutorial we will learn about routing signal via the 8 Stereo buses of the VST Editor. Before we do so let’s talk a little about the recording of audio versus the recording of MIDI. When you record MIDI data, information about how hard a key is struck is documented in a parameter called Velocity. Basically, electronic instruments translate the speed with which you strike a key with how loud to make it sound. This is true in most cases. However, you must recognize that some sounds have no velocity sensitivity – they do not get louder according to how hard or fast you strike the key (like the B3 sound in this demo). Organ sounds are not velocity sensitive – because electronic organs are not touch sensitive keyboards. Actually, in a synthesizer you can setup a Voice where the faster/harder you struck the key the softer it would get… but most sounds work in a fashion where the faster/harder you strike the note the louder the sound. Velocity is rated on a scale of 1-127 with 127 being the maximum. How loud your track is when it is MIDI data is partially determined by this performance parameter, velocity. If you have been paying no attention to Velocity when you record your MIDI tracks you may find that you will from now on.
When we convert MIDI tracks into audio (sound) tracks, what we are doing is actually recording the data to a sound track, where we no longer measure with velocity. We are now concerned with level in measurement of dB (decibels). The audio output of your Motif-Rack XS is controlled by the following parameter:
· Press [UTILITY]
· Select “General”
· Press the Cursor Down to select page 4/5 and 5/5
Here you can see the OUTPUT GAIN parameter for each of the Motif-Rack XS outputs. Typically, your Motif-Rack XS is set so the L&R output Gain is set to +6dB. You will discover that you can set this parameter to either +6dB or 0dB. The reason you are given two settings is because the Motif-Rack XS has two principal situations where you will be using it. One, of course, is “live†performance where you are typically, playing a single sound at a time. The other of course is when you are “sequencing†where you may have as many as 16 sounds playing at a time. Having a parameter that allows you to adjust the overall output gain of the XS is simply a good practice.
If you notice from the mix of this song the individual track volumes are quite conservative: 87, 99, 90, 93, 102, 80, 80, 85 and 90. Yet this, if you check your Cubase meters, will max out just short of -0.0dB. Each song is different. It depends on the combination of instruments and the activity of each. The main L&R output Gain defaults to +6dB – had the need arisen to add more tracks (there are still 7 tracks available, it might have been necessary to lower the overall Gain to 0dB. This is why the gain control is there. You don’t want to have to push everything up – you want room to mix. Mixing is the art moving of levels up and down to find a musical balance where all instruments are not only heard but their contribution has the right musical impact on the listener. It is highly unlikely to reach 0dB on a meter with a single instrument but very likely to exceed it with 16 instruments. Your job as recording engineer is not to exceed 0dB at anytime. If you need to turn signals down to make this happen, that is the job. Get a balanced mix without clipping the system. If you need to reduce the entire mix but want to keep your proportions, this is where the GAIN control is your friend. Make it work under 0dB on the output meter, that is the task.
You may notice that while the L&R output Gain is +6dB, the mLAN/Firewire outputs are set to +0dB. For this exercise drop the L&R Gain down to 0dB – notice how a drop of 6dB is very significant. When using the main L and R outputs along with the mLAN assignable outputs, make sure that all GAINS are set to the same value. Remember this is adjustable when you need to create more mixing headroom.
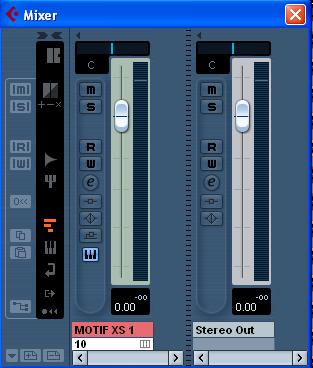
Test out your mixing skills using the sliders in the Motif-Rack XS Editor VST to create your own mixed balance of these 9 tracks. In Cubase, open the MIXER view. You do so by touching F3 on your QWERTY or going to DEVICES > MIXER
The fader on the left represents the Motif-Rack XS L&R composite mix. The fader on the right is the stereo out of Cubase. They will both be the same – because we have not done anything extra to the signal yet. Initially, the faders will be set at 0.00. Just above that you will see a minus infinity indication (quiet). This number will change in response to the maximum level the signal reaches during playback. And will remain at the highest value it receives. This is because engineers know that any clipping is bad. Clipping is when you exceed 0.00dB and although it may be so fast you cannot hear it or see it, clipping leads to mixes that sound harsh. So a PEAK HOLD function is built-in. If you clip you will see a red CLIP indicator and the small number will show you by how much you clipped. Both indicators will HOLD – so even if you look away, you cannot claim you did not know you clipped the mix.
Your task is to get a mix (balance) of the 9 tracks without clipping. If you do clip, you can reset the indicator by clicking directly on it. This level control portion of mixing is the science. The art is in how everything sounds. That is a whole course in itself. But the science of level control is so simple yet so very important. You must maintain a good balance between the instruments yet never allow the signal to clip.
Audio Mixdown Example 2
Let’s now dig a little deeper into some routing and re-routing of audio via the available buses. As mentioned in PART ONE of this series:
“When you route a PART to an individual OUTPUT (assignable mLAN/Firewire output) it is removed from the SYSTEM. The reason you route something to an individual assignable output in the first place is so that you can process it differently. That would be the reason. If you are not going to process this signal separately, you gain nothing really from routing it to a separate audio output.â€
We have already discovered it is possible to create audio from the MIDI data without taking each Track and recording it separately. In Mixdown Example 1, we had 9 Tracks of MIDI data routed to the Motif-Rack XS tone engine and returned via the Motif-Rack XS Editor VST instrument… that audio was all routed via the main L&R outputs of the Motif-Rack XS. A close look at the main screen of the Motif XS Editor VST you can see that OUTPUT SELECT for each of the tracks is set to L&R.
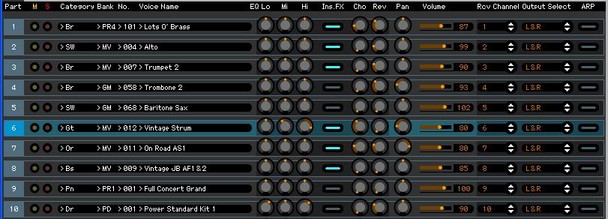
What we will do for this example is take the Rhythm Guitar Part (PART 6) and take a closer look at what is happening with it. Click on the number 6 in the PART column on the far left of the screen. Reading across left to right we learn that this (Gt) Guitar is EQ’d a bit, it has INSERT EFFECTS active (INS FX), there is some Chorus Send, it is currently panned slightly to the left channel, the Volume is 80, and it is currently routed out on the main L&R Output.
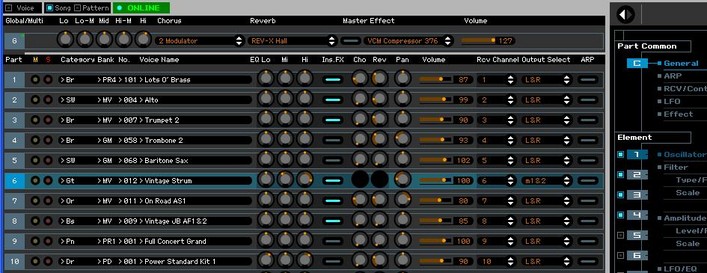
To view more details click on white arrow just under the Yamaha logo toward the upper right of the screen. This arrow will activate the pull over and reveal the edit parameters for PART 6. Both COMMON parameters and individual Element parameters are shown. Under the COMMON parameters, click on the word “Effectâ€. Now you can look at the processing already engaged on this guitar part.
Insertion Effect A (Effect A) is a Distortion, Amp Simulator 1 (Stack1)
Insertion Effect B (Effect B) is a Tremolo/Rotary, Tremolo (Fast)
The System Effects are listed as:
Chorus, 2 Modulator (SEND = 48)
Reverb, REV-X (SEND = 0)

Elements 1, 2 and 3 are routed directly to Effect A (green), Element 4 is routed directly to Effect B (blue). Effect A’s output is routed to Effect B. The red arrow represent the send to the individual (mLAN/Firewire) output (before the Chorus send/Reverb send and System output).
What we are going to do is take this guitar and sent it out via a stereo pair of audio buses. This will remove it from the main mix and send it via mLAN/Firewire to its own discreet output. This will mean it will leave the left to right signal path just after the Insertion Effects and before the System Effects. So it will go out via mLAN with its (two Insertion Effects) Distortion and Tremolo in tact.
· Click on the white arrow to close the Edit pullover.
· Under the OUTPUT SELECT option set PART 6 so that it is assigned to “m1&2â€
When you do this you will notice that the Chorus (Cho) and Reverb (Rev) knobs disappear. This is because as we indicated the signal leaves the signal path before it reaches the Chorus Send and Reverb Send knobs.
Go to DEVICES > VST INSTRUMENTS
Ensure that the second pair of Motif-Rack XS audio returns are active: Motif XS 2
You do so by clicking on the VST INSTRUMENTS OUTPUT icon (shown below) to open the list of available Returns. The active outputs will have a check mark next to them:

Upon activating this second pair of stereo returns the main Cubase window will now add a VST INSTRUMENT lane for this return. When you press Play, the guitar, now removed from the main mix, is isolated on its own audio lane.
This is significant because, now that we have the guitar isolated, we can process it separately with VST Effects inside of Cubase. Recall that this was our important “theory of operation” - you route something to its own audio lane when you wish to process it additionally in Cubase. Let summarize the flight of this guitar so far: The original MIDI data that is playing the Vintage Strum Guitar Voice is recorded in Cubase on Track 6.
Open the MIDI TRACKS folder to find this data.
It is then sent on MIDI channel 6 to PART 6 of the Motif XS tone engine.
There it is running through an Amp Simulator and a Tremolo Effect (as the INSERTION EFFECTS), and is then routed from the XS as “m1&2†(firewire) output to Cubase. It arrives in Cubase via the Motif-Rack XS VST Motif-Rack XS 2 Return.
Motif-Rack XS 1 = Motif-Rack XS Main L & R
Motif-Rack XS 2 = Motif-Rack XS m1 & 2
Motif-Rack XS 3 = Motif-Rack XS m3 & 4
Motif-Rack XS 4 = Motif-Rack XS m5 & 6
Motif-Rack XS 5 = Motif-Rack XS m7 & 8
Motif-Rack XS 6 = Motif-Rack XS m9 & 10
Motif-Rack XS 7 = Motif-Rack XS m11 & 12
Motif-Rack XS 8 = Motif-Rack XS m13 & 14
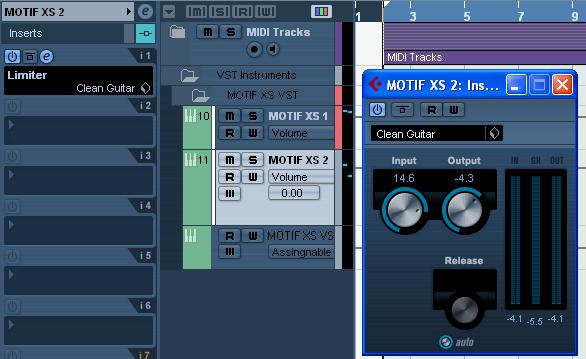
As soon as you activate the second STEREO Output “Motif-Rack XS 2â€, Cubase will create an additional audio lane (Track number 11). And as soon as you route PART 6 (the Guitar) to “m1 & 2â€, the signal will arrive in this audio lane. The significance of the audio being here is that it is isolated from the other Parts of the mix – to prove this press the “S†(Solo) button on this audio lane, track 11.

The slider associated with PART 6 in the Motif-Rack XS Editor VST will adjust the output level of this audio output. Raise and lower the slider to hear this happen.
In Cubase, open the MIXER (use the F3 shortcut, or go to DEVICES > MIXER). The additional audio lane is now added to the Mixer:
You will observe that being a stereo track and we are using a stereo send, that the pan position is respected in this audio lane. The guitar is panned slightly to the left. (This should be reflected in the meters):

Take your time. We have seen a lot of things happen here. We routed PART 6 of the Motif-Rack XS to a pair of mLAN/Firewire Outputs. We went to the VST INSTRUMENT Rack and activated the Motif-Rack XS 2 (the second pair of outputs). This added an audio lane in the Motif-Rack XS VST folder of Cubase, and it also added a channel on the Cubase Mixer.
Now that we have the guitar routed to its own audio lane, let’s see what we can do with it. On the main Track screen with lane 11 selected, click on the “INSERTS†in the Track Inspector (the left portion of the screen).
The INSERTS rack has 8 locations; 6 pre- and 2 post- Here we are going to assign the guitar part to a Limiter. Here’s how:
· Click in the first rack space to open the VST EFFECT list
· Under the DYNAMICS heading select the “III-Limiter†– this denotes a VST3 Effect.
A Limiter is a device in the amplifier family. It is an amplifier where the more signal you put in… the output remains the same. We are all familiar with amplifiers that turn things up, but here is an amp that prevents items from getting any louder past a set point. Since one of Newtown’s Laws is that we cannot lose or destroy energy, what happens? Well, the sound gets heavier, more present.
As you select the LIMITER, its editor will open. Click on the small cube, and select LOAD PRESET… Select the CLEAN GUITAR preset.
Notice as you increase the INPUT the Meter for Motif-Rack XS 2 on the Cubase MIXER only increases a very little bit while you can make the guitar much, much louder. The guitar is now heavier, it is taking up more sonic space in the mix. A limiter prevents energy from getting lost in the peaks and thickens the sound. Now at some point you will start to hear a negative effect. Where the natural sound is being squashed (obviously, your ear will tell when you have too much of this limiter). You will notice in the Limiter’s edit window you will see GR (or Gain Reduction): A meter that works from top down. Showing how much of the peak is being limited (reduced/squashed). Play around with the INPUT level of the LIMITER see that you can increase the perceived volume tremendously without actually clipping the channel. A limiter, quite literally, puts a limit on the peaks.
The Compressor and Limiter are very valuable tools. But take a warning: They should be used wisely and sparingly. You don’t want to compress or limit everything in your mix. It is generally used on items that are percussive and have transient peaks. (For a discussion on Compressor/Limiters please see the article on the VCM Compressor 376). I can remember playing in a band (back in the day) and we would all have a good laugh when one of the members of the band purchased a new effect. If the guitar player got a chorus processor, we had to be prepared for the fact that for a few weeks, he was going to use it on every song. If I got a new pedal effect for my Rhodes, they had to get used to the fact that for a few weeks I was going to use it too much. Don’t let that happen, if you process everything in your mix to make it special, then nothing is special.
Permalink