mySoftware [Updates]
newProducts [YOK]

MOX6/MOX8 Computer Setup Windows 7
The connection between the MOX6/MOX8 and your computer will allow you to expand and enhance your music production experience. The USB connection between the instrument and the computer will allow you to transfer both MIDI and Audio into your favorite ASIO compatible DAW. This is handled by the Yamaha Steinberg USB driver. Its job is to allow your computer to use the MOX6/MOX8 hardware as a functioning audio (and MIDI) interface. Do not let the Steinberg in the name cause you to think you cannot use this driver if you are not using a Steinberg DAW, Steinberg just happens to be one of the developers of this driver - it can be used by any DAW that is capable of using an ASIO driver. ASIO and VST are standards actually invented by the folks at Steinberg and are fairly widely accepted protocol standards.
This particular guide is for those using Window 7, 64-bit and want to setup Cubase with the Editor VST…
CHECKLIST: What you will need for this:
MOX6/MOX8 connected to your computer via USB
Download and install the Yamaha Steinberg USB Driver Windows v1.8.3
Download and install the MOX6/MOX8 Remote Tools v1.1.3 (or later)
Download and install the MOX6/MOX8 Editor Standalone/VST v1.6.0 on Windows
Install the Cubase AI5 or AI6 provided on the DVD that comes with your MOX (or any version of Cubase 5 or 6; or any DAW capable of using an ASIO driver).
The audio outputs of the MOX6/MOX8 connected to a quality stereo sound system
Downloads are found at the Official Yamaha Download:
http://download.yamaha.com
The REMOTE TOOLS and picking the MOX6/MOX8 Editor VST
The MOX6/MOX8 Remote Tools are very important, particularly from an ease-of-use point of view. They include not only the REMOTE EDITOR for use with VSTi, but it includes the important MOX6/MOX8 Extension to Steinberg software - a group of product specific improvements that make setting up your MOX6/MOX8 in Cubase (in particular) easy. In fact, it will make most all of the necessary connections and configurations for you. This way you don’t have to worry about making every single setting manually. This EXTENSION written by Yamaha is designed to enhance the integration between your hardware (MOX6/MOX8) and your software (Cubase). Cubase will detect a connected MOX and ask if you want to use it for your ASIO Driver. It will automatically detect and name the MOX Ports. Not only that, it will make active the MOX as a MIDI source (PORT 1); it will assign the MOX as a remote control surface fully integrated to control Cubase AI5.1.1 or later and any VSTi’s you may be working, via (PORT 2);
The MOX6/MOX8 EDITOR VST allows you to run the MO-X as a VST Instrument within Cubase. What this really concerns is how the MIDI signal is going to be routed, and just where the audio signal, that is generated in response to that MIDI data, is going to go. This is useful for when you are doing your MIDI tracking in your computer sequencer and wish to monitor audio through the DAW mixer and its effects.
The Editor can be run as a stand alone application when launched directly from its icon. It is fundamentally the same Editor (same exact capabilities) except that rwith it as a plug-in application. This is useful for folks that are not running a VST3 compatible DAW. The EDITOR STANDALONE can be run along side ant DAW software. While the same program can be launched as a plug-in VST application in a ompatible situation.
If you simply have a single MOX6/MOX8 you will find the Editor VST will make it easy for you to handle Audio and MIDI routing in one place. The EDITOR VST does require that your DAW be VST3 compatible. VST3 is a recent improvement Steinberg has made to the VST protocol which extends the capabilities available and how computer resources are used (Virtual Studio Technology).
If you do not have a VST3 compatible software (or your DAW is not yet compatible) you can run the EDITOR as a stand alone. “Stand alone” means you can run it along side of any DAW, and use it to manage communication with the external MOX. Basically the Editor runs in the background. You can minimize it when you want to work with your DAW and recall it when you want to edit the MOX… so they are running next to each other. However, if you are running a Steinberg DAW.
Setup your MOX6/MOX8
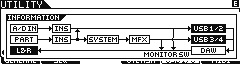
Press [UTILITY]
Press [F5] USB I/O
Press [SF1] OUT CH (OUTPUT CHANNEL Mode)
Select the OUTPUT CHANNEL mode you want to use; “2CH” or “4CH”
Important note about the [SF1] OUT CH (OUTPUT CHANNEL) parameter: Pressing this button calls up the display which determines whether the maximum number of output channels for USB is 4 channels (2 stereo channels) or 2 channels (1 stereo channel). If transfer of the audio signal between the MOX6/MOX8 and the computer connected to the MOX6/MOX8 is compromised or impossible, set this parameter to “2ch.†This setting reduces the CPU load of the computer, and may resolve the problem. After changing this setting, press the [ENTER] button, then restart the MOX6/MOX8.
_ After changing this setting and pressing the [ENTER] button, make sure to restart the MOX6/MOX8; the instrument will not operate otherwise. Before restarting, make sure to store any important edited data to prevent it from being inadvertently lost.
2CH
You would select this option when, for example, you want to record all connected devices as a single stereo audio track. Both the A/D INPUT and the internal MOX tone engine are routed to the single stereo output bus. If you play and sing and want to document everything as a ‘live’ recording. If you connect the band’s mixer to the A/D INPUTS you can record both the band and your performance on the MOX as a single stereo file into your DAW.
4CH
You would select this option when, for example, you want to record certain PARTS discreetly. There are now two stereo buses available, you can route the A/D INPUT to USB 1/2 while the internal PARTS are heard through USB 3/4. This 4 Channel allows for dual stereo feeds from the MOX to your computer. How you use this will depend on what you want to accomplish.
If your computer is incapable of processing “4CH” of audio simultaneously, you can opt to use the “2CH” setting as this requires less CPU resources. Once you select an OUTPUT CHANNEL Mode, if you needed to make a change you will need to press [ENTER] and to reboot for the setting to take place. Once you have, this setting will remain until you change it (press ENTER and REBOOT).
There are 3 different USB I/O (input/output) Modes that help you with working within the computer environment:
VST
2StereoRec
1StereoRec
The important thing to learn here is that each has a purpose and represent a different signal path. Knowing how (through which devices) the signal is routed is fundamental to being successful with any of this recording audio. If you are wondering why you cannot hear reverb on a particular A/D INPUT it will typically come down to your signal path. And can be solved by knowing how to select and create the best routing situation for what you want to accomplish. There is no one way to route signal - there are many - and ultimately you wouldn’t want it any other way.
When the USB I/O Mode is set to “VST” or “2StereoRec” - the A/D INPUT is routed directly to the USB 1/2 output without going through the MOX6/MOX8’s System and Master Effects.
If you want, for example, a microphone to access the internal MOX6/MOX8 System reverb and chorus processors, you must set the USB I/O Mode to “1StereoRec”. The other two modes are for recording audio to the computer. “1StereoRec” is used for “live” (normal) use.
In any of the 3 USB I/O modes, you can select the A/D INPUT as one of the PARTS that can use two Insertion Effects. Insertion Effects are assigned directly to a VOICE or the A/D Input.
QUICK SETUP 1 (DAW Rec)
You can select this Quick Setup by pressing [QUICK SETUP]+ [A] GROUP buttons (you can see that the QUICK SETUP button is linked to the first six GROUP buttons with a dotted line silk-screened under the [A]-[F] buttons] – this gives you quick access to the six provided Quick Setup templates.

“Audio†= “Config2â€
Use this setting when recording the signals from the tone generator and the A/D INPUT [L]/[R] jacks separately to DAW software, and playing the signals from the OUTPUT [L/MONO]/[R] jacks directly.
• Mode = 2StereoRec (dual stereo record)
• Direct Monitor Switch AD = ON
• Direct Monitor Switch PART = ON
“MIDI†= “Config1â€
Use this setting when recording this instrument’s performance (not including Arpeggio data) to the DAW software.
• Local Control = off
• MIDI Sync = auto
• Clock Out = off
• Arp Out Switch = all off
• Kbd Transmit Ch = 1
• Track INT Switch = all on
• Track EXT Switch = all on
Quick Setup 1 TRANSLATION: The best setup for recording MIDI and audio to your DAW is Quick Setup 1 (DAW REC). It can use the dual stereo record (“2StereoRecâ€) output function. You can select this parameter as follows:
On the MOX6/MOX8
Press [UTILITY]
Press [F5] USB I/O
Set the MODE = 2StereoRec (dual Stereo Record)
Press [SF1] OUT CH (Output Channel)
Set USB AUDIO OUTPUT CHANNEL = 4CH*

*If you need to change this setting you will be asked to “Press [ENTER] to executeâ€. This will be followed by a warning message that edited data which has not been stored, will be discarded. Press [ENTER] to continue. (Or if you have been working on a sequence, and have not yet STORED your latest changes, Press [EXIT] to return to your data, and excuete a [STORE] routine. This will ensure that you lose no data when you reboot.) Your new setting will be written to Flash ROM and finally, you will be asked to ‘REBOOTâ€.
In this configuration the first pair of USB audio outputs (USB1/2) can be used to route the A/D INPUT and/or any selected internal PART or PARTS discreetly to your DAW. The second pair of audio outputs (USB3/4) route the internal tone generator on a completely separate stereo bus to your DAW. The two stereo buses differ in where the signal goes (that is, through which processors) before it leaves the MOX6/MOX8 and travels to the computer.
The MIDI configuration that is selected by this template will allow you to assign and route MIDI data to the tone engine via the DAW’s track MIDI channel assignment. That means when you have a track active in your DAW its MIDI channel assignment determines to which MOX6/MOX8 PART you are communicating.
The two arrows pointing straight down indicate that signal is also routed directly to your L&R (Monitor Speaker) OUTPUTS. This allows you to hear what you are sending to the computer without the normal computer induced latency. These lines “Monitor Switch” denote that direct monitoring is active in this template and that zero latency monitoring is available.
USE CASE: While building MIDI tracks in your DAW, the tone generator PARTS are routed by default through USB3/4. You have the option of selectively routing any PART or PARTS to USB1/2. You would do so to record them separately to audio tracks in your DAW. Note that when routing a PART to the USB1/2 bus you are removing it from the SYSTEM EFFECTS (Reverb and Chorus) and from the MASTER EFFECTS. It does or can retain its own INSERTION EFFECTS.
The System Effects are those shared by all channels via an individual chanel send/composite stereo return setup. All the SEND amounts (each channel has a SEND amount) are combined before being routed to the Reverb and/or Chorus processors, and a stereo return is mixed back to the main signal path… This is just like it would be on any mixing console that has two AUXILIARY SENDS on each Channel , a MASTER AUX SEND amount and a STEREO FX RETURN. Finally, all system signals go through the MASTER EFFECT.
The A/D INPUT is fixed to USB1/2, so another scenario could have you connect an analog mixer recording it to a stereo track in Cubase, while the MOX6/MOX8 is recorded to separate stereo track.
Setup in Cubase: Basic Configuration
Launch Cubase
Open a NEW PROJECT > use the “EMPTY” template
We will explain how the routing takes place. Later we will show you how to launch using a pre-made Template. For now start with the EMPTY Template.
Create a NEW FOLDER on your computer to house your Project as directed by Cubase - this is where Cubase will keep all the data (images, audio, MIDI, setup, etc)
Go to DEVICES > DEVICE SETUP > MIDI > MIDI PORT SETUP

In the column labeled “IN ‘ALL MIDI’ INPUTS” you want to mark the items that are your MIDI controllers. In this case this the MOX on PORT 1.
Additionally you might mark PORT 3, if you have an additional controller connected to the MOX 5-pin MIDI INPUT. The MOX will “THRU” this data to the computer as PORT 3. Significantly you do not want to mark PORTS 2, 4 or 5 here - make sure that they are NOT marked. You only want the ports marked that contribute data to your Tracks. This can only be PORT 1 and/or PORT 3.


Setup in Cubase: Addressing the MOX6/MOX8 via the EDITOR VST
Because you have properly installed the REMOTE TOOLS/Extensions, Cubase will automatically setup MIDI, REMOTE, and VST AUDIO SYSTEM settings for you. If not please see the “Cubase: DEVICES Troubleshooting†article.
Go to DEVICES > VST INSTRUMENTS > Click in the first empty item on the instrument rack > EXTERNAL > MOX6/MOX8 VST

You will be asked if you want to create a MIDI Track assigned to this VST device… Create it.
The track’s MIDI OUT will be assigned to the 1-MOX6/MOX8 VST MIDI IN (as opposed to the MOX6/MOX8-1)
The MIDI CH will be set to 1
Each time you want to play another PART of the MOX6/MOX8 you will need to create another MIDI Track and assign it to the 1-MOX6/MOX8 VST MIDI IN. It will be created with the next higher numbered MIDI channel.

The MOX6/MOX8 Editor VST and the tone generator settings
Verify your setting within the Editor VST. If you have setup up before it should just come online. However, for the purposes of this article, we will go through the verification steps - so if you ever need to troubleshoot it you will know how to do so:
On the EDITOR VST:
Go to FILE > SETUP
Verify that the USB Port Details are setup as follows:

Notice that the MOX6/MOX8 communicates on two separate PORTS (Port 1 and Port 4). Port 1 is the normal MIDI OUT messages of musical note, controller and tempo data. Port 4 is used exclusively for bi-directional communication between the Editor and the MOX6/MOX8 hardware (which is external to the computer).
Tip: You can see in the screen shot above in the AUTO SYNC SETTINGS, I have opted to NOT have the VOICE data restored from the Computer > Synth (PC > MOX6/MOX8). This is a personal choice. The reason I have done this is because anytime the EDITOR is taken OFFLINE and then brought bak ONLINE, this is the data that will be sent from the computer to the MO-X (synchronizing). You do not need to restore the VOICES (that is all USER bank Voices and Drum kits) every time. In fact, it would be the exception, the rare case, when you actually need to restore all of the VOICE data. Setting this to OFF will make synchronization much quicker and more efficient - when you actually do need to restore all VOICE data, you can check that option. I have opted to restore the GLOBAL and the CURRENT settings. This means when I open this Cubase Project the program will ask me if I wish to restore data to the MOX6/MOX8, when I confirm, my Utility mode and MIX settings (CURRENT SONG or PATTERN MIXING) will be restored to my hardware. It simply is not necessary to wait for your VOICES to reload if they are already in place.
Go to FILE > VSTI SETUP
Verify that your USB AUDIO BUS outputs are setup as follows:

Permalink